Creating your first service using Kubernetes on AWS
Lately we’ve playing with Kubernetes (or K8s) at work. Kubernetes is an open source orchestration system for Docker containers. It comes with awesome features like fault tolerance, auto-scaling and others.
In this post we give an overview on how to install Kubernetes on AWS and how to run your first service.
Installing Kubernetes on AWS
The first step is to create a new instance. Once the instance has booted up, log in and enter your AWS credentials (the K8s installer needs the credentials to create objects in AWS):
$ mkdir -p ~/.aws/
$ vi ~/.aws/credentials
Let’s install Kubernetes next. There are a few of options that can be tweaked:
$ export KUBERNETES_PROVIDER=aws
$ export MASTER_SIZE=t2.large
$ export NODE_SIZE=t2.large
$ wget -q -O - https://get.K8s.io | bash
After this command finishes K8s is up and running! By default the scripts creates a cluster with 1 master node and 4 minion nodes. It also creates 2 security groups that allow SSH access to master and minions and HTTP access to the master.
K8s provides a REST API to interface with the cluster. The information to access that API including the URL, username, password and tokens can be found in the config file:
$ cat /home/ec2-user/.kube/config
In our case the API lives in the following URL:
$ curl https://52.35.142.134

{
 "paths": [
   "/api",
   "/api/v1",
   ...
   "/ui/",
   "/version"
 ]
}
Instead of using the REST API directly we’re going to use a CLI tool called kubelet. Let’s add the paths and export a few environment variables in ~/.bashrc:
$ export PATH=$PATH:/home/ec2-user/kubernetes/cluster/:$HOME/kubernetes/platforms/linux/amd64/
$ export KUBERNETES_PROVIDER=aws
$ source ~/.bashrc
K8s runs a few services by default including DNS, logging, monitoring and others:
$ kubectl cluster-info
Kubernetes master is running at https://52.35.87.147
Elasticsearch is running at https://52.35.87.147/api/v1/proxy/namespaces/kube-system/services/elasticsearch-logging
Heapster is running at https://52.35.87.147/api/v1/proxy/namespaces/kube-system/services/heapster
Kibana is running at https://52.35.87.147/api/v1/proxy/namespaces/kube-system/services/kibana-logging
KubeDNS is running at https://52.35.87.147/api/v1/proxy/namespaces/kube-system/services/kube-dns
KubeUI is running at https://52.35.87.147/api/v1/proxy/namespaces/kube-system/services/kube-ui
Grafana is running at https://52.35.87.147/api/v1/proxy/namespaces/kube-system/services/monitoring-grafana
InfluxDB is running at https://52.35.87.147/api/v1/proxy/namespaces/kube-system/services/monitoring-influxdb
Logging
Kubernetes’ default option for logging is to run a fluentd agent on each node. These agents send the logs to ElasticSearch where they’re stored and indexed. To explore the logs there’s a GUI named Kibana:

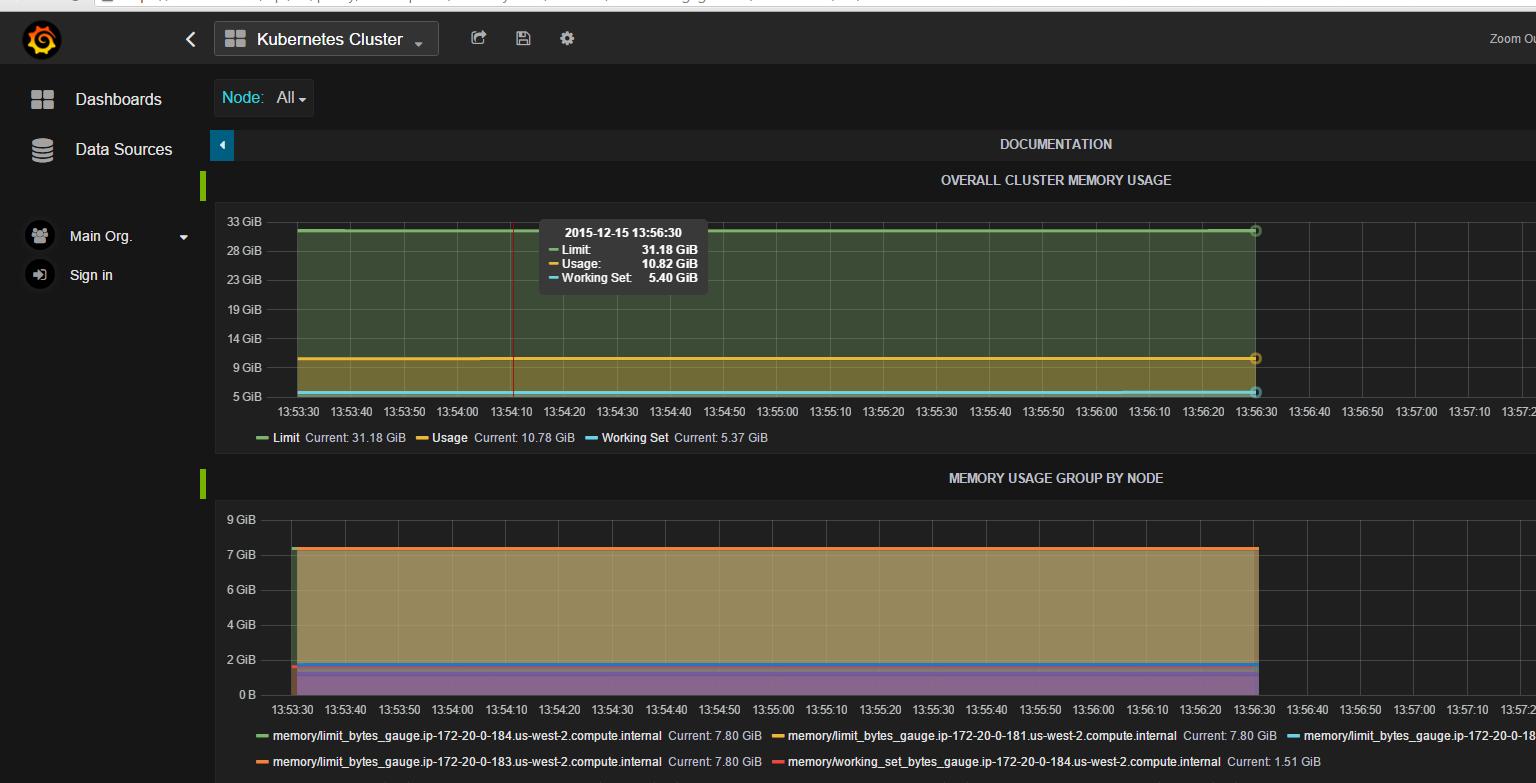
Monitoring
There’s an analogous solution for monitoring as well. Each node runs a heapster agent that collects metrics. The metrics are sent to influxdb (a time series database) where they can be queried using a REST API or a GUI named Grafana:
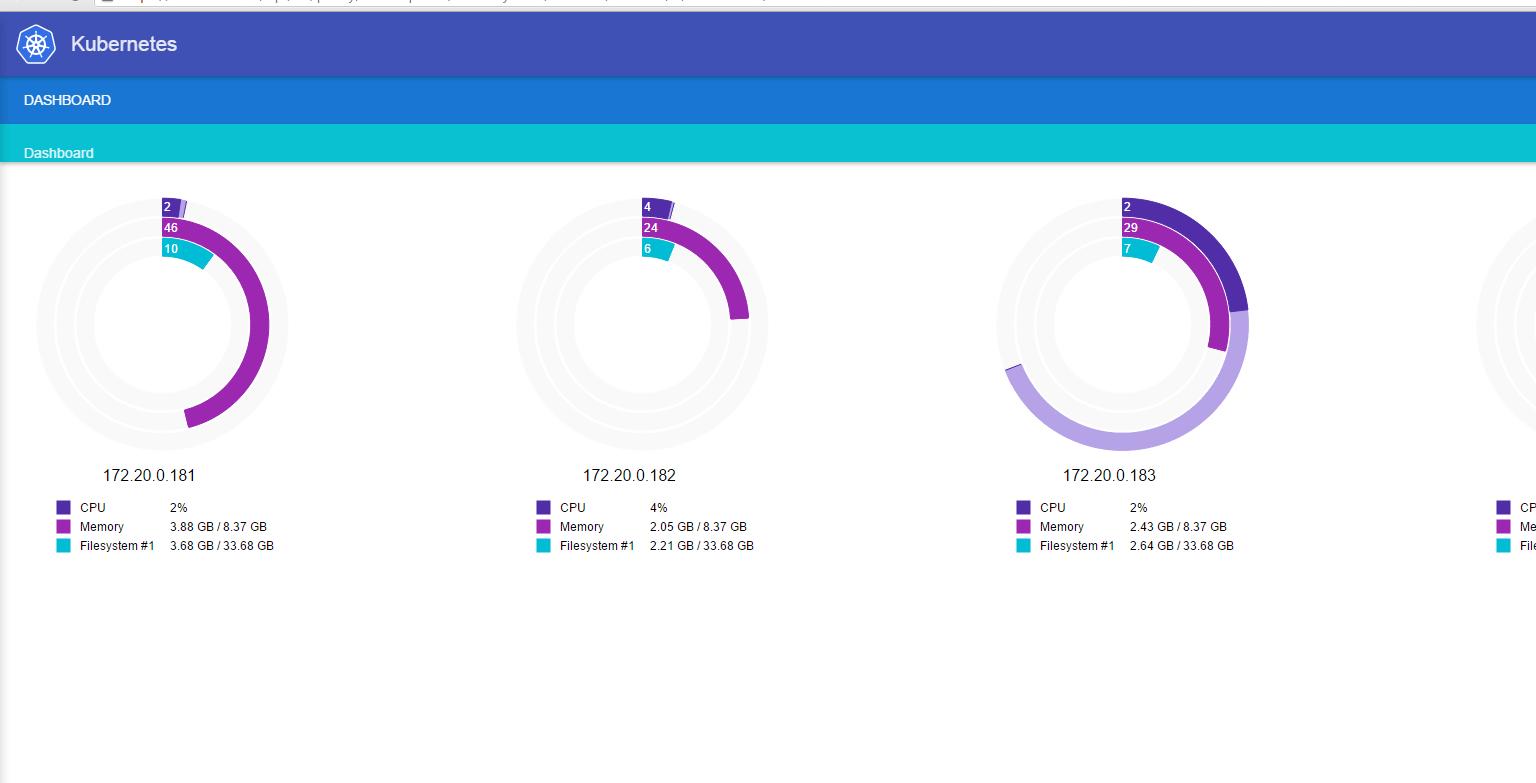
Kube-ui
Kubernetes comes with a graphical dashboard with information of the nodes that form the cluster.
And of course there’s the possibility to SSH to the nodes directly:
$ ssh -i ~/.ssh/kube_aws_rsa ubuntu@52.35.178.251
Running your own service on K8s
To run your service on K8s the first step is to create a Docker image out of it.
In this example we’re going to Dockerize the hello-node service. This is just a simple web server that outputs “Hello world” when accessed. To create a Docker image we just add a simple Dockerfile to the project:
FROM node
ADD index.js
CMD node index.js
EXPOSE 8000
Then let’s make sure Docker is installed and running:
$ sudo yum -y install docker git
$ sudo service docker start
Let’s get the code:
$ git clone http://github.com/jorgemarsal/hello-node
$ cd hello-node
To build the image we run docker build:
$ sudo docker build -t jorgemarsal/hello-node:0.0.1 .
Finally we can push the image to a repository. Later on Kubernetes will fetch the image from there:
$ sudo docker push jorgemarsal/hello-node:0.0.1
Kubernetes spec files
To run the service on K8s we need to create a Replication Controller spec and a Service spec. In the replication controller spec we specify the docker image, the number of replicas and the port the application is listening on:
// rc.json
{
   "apiVersion": "v1",
   "kind": "ReplicationController",
   "metadata": {
       "labels": {
           "app": "hello-node",
           "version": "v1"
       },
       "name": "hello-node-v1",
       "namespace": ""
   },
   "spec": {
       "replicas": 1,
       "selector": {
           "app": "hello-node",
           "version": "v1"
       },
       "template": {
           "metadata": {
               "labels": {
                   "app": "hello-node",
                   "version": "v1"
               }
           },
           "spec": {
               "containers": [
                   {
                       "image": "jorgemarsal/hello-node:0.0.1",
                       "name": "hello-node-v1",
                       "ports": [
                           {
                               "containerPort": 8000,
                               "name": "hello-node"
                           }
                       ]
                   }
               ]
           }
       }
   }
}
Let’s create the Replication Controller:
$ kubectl create -f rc.json
In the service spec we specify the ports and we request a load balancer for our service:
// service.json
{
  "kind":"Service",
  "apiVersion":"v1",
  "metadata":{
     "name":"hello-node",
     "labels":{
        "app":"hello-node",
        "version":"v1"
     }
  },
  "spec":{
     "ports": [
         {
             "name": "hello-node",
             "port": 8000,
             "targetPort": 8000
         }
     ],
     "selector":{
        "app":"hello-node",
        "version":"v1"
     },
     "type": "LoadBalancer"
  }
}
Let’s create the service:
$ kubectl create -f svc.json
After a few seconds the service should be up and running. We can check with:
$ kubectl get pods
$ kubectl get services
Since we specified type: loadbalancer, AWS automatically creates a ELB for us.
We can access the service using the ELB URL. In a real-world example probably we’d want a friendlier DNS name:
$ curl http://a9abab161a37511e5810906731b2c52d-1058840568.us-west-2.elb.amazonaws.com:8000/
hello world
Even though the hello-node service is extremely simple, we get a few nice things for free. Kubernetes is constantly polling the service and if something goes wrong the service is automatically restarted on another node. We also have the possibility to scale the number of hello-node containers up or down easily. Finally we get logging and monitoring.
Acessing the K8s API programmatically
Doing things manually is fine to start getting familiar with the system, but for more serious projects you should access the K8s API programmatically. At work we mainly use Python and we’ve found a simple library named pykube that’s pretty useful.
Pykube needs a few parameters to function. As mentioned previously we can get those parameters from Kubernetes’ configuration file. It’s also possible to access the API from within a running container by using the following parameters:
- URL: https://kubernetes
- user = nobody
- token present on file
/var/run/secrets/kubernetes.io/serviceaccount/token - CA present on file:
/var/run/secrets/kubernetes.io/serviceaccount/ca.crt
In this gist you can find some functions to help you get started.
Other resources
Hope this helps you get started with your next kubernetes project on AWS!